11th Century round Crwth (Welsh bowed
lyre)
This is the first of the Crwth projects. It is being designed based on the modern folk Crwth of Wales, since that is the earliest extant instrument we have available, and it can be tuned and played according to manuscript instructions from the 1100s.
I am basing the shape of the instrument on the picture of King David with his Crwth, though I am building this as a 6 string variant that is the 'traditional' Crwth, similar to the 6 string lyres of the period.
Note that if I were to build this as a 3 string instrument, it would have a similar, but not nearly as rich harmonically, tone, as the 6 string crwth is tuned in 3 octave pairs, and the 3 string would be tuned in 3 singles with the same intervals.
This is a bowed lyre, but the bass pair of strings can also be plucked with the thumb as a drone.
 Click here for a sound clip (until the instrument is finished, I have
borrowed a small snippet ot sound from the educational page that
actually got me started ion this adventure with the Crwth. Once
this instrument is finished, this clip will be replaced with one of my
own)
Click here for a sound clip (until the instrument is finished, I have
borrowed a small snippet ot sound from the educational page that
actually got me started ion this adventure with the Crwth. Once
this instrument is finished, this clip will be replaced with one of my
own)
(Note. I haven't mentioned this in any of the previous instrument documents, but my method of documenting is to take pictures of each step 'in the rough' as it were, then to take finished pictures of the instrument. I believe that seeing something with some of the toolmarks still in it, layout lines still on the surface, not smoothed and painted and oiled, shows you far more than a 'finished' photo of each step. So you can see what I am doing, not just read the words and imagine. I think it works better that way. And you still get to see pictures of the pretty when it is complete)
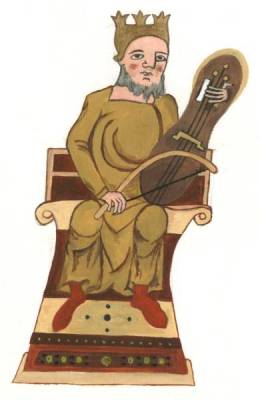
This is the artwork I am basing this Crwth on. It is from one of the 11th century manuscripts from Limoges in Brittany. I am using the general shape and size from the illustration, and working with what I have learned from Lyre and Rebec building to fill in the rest
Comparative measurements on me while sitting give me a 25 inch crwth, 7 inches at the swelling at the peg end, and 9 inches at the swelling at the soundbox.
The Crwth body will be built in the same way as the rebec and the lyre - hollowed from a block and not built up. The soundboard will be spruce, the
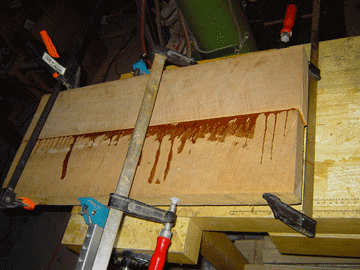
Here is the body being glued up. This instrument would have been hollowed out of 1 single piece, but the cherry I had was just crying to be made into an instrument, so I joined 2 pieces to give me the width I need for the instrument. The joint will be visible only on the back side - the fingerboard and peg reinforcements will cover it on the front.
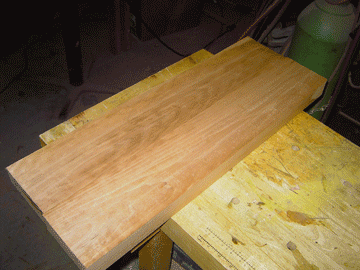
The cherry joined and planed - almost 10 inches wide, 26 inches long in this picture. This is a beautiful piece of wood, with no stress checks or fractures anywhere along the length.

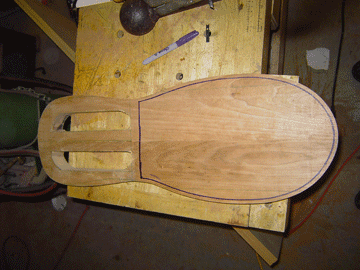
The instrument's basic shape - a little stockier than the illustration, but I want to use a traditional 6 string setup instead of a 3 string as shown in the David illustration - it provides a much different, and IMHO cooler, sound. So it is about 1 inch wider in the neck area and peghead than it would be if I were actually following the illustration, and to balance it I made the soundbox 1/2 inch wider.

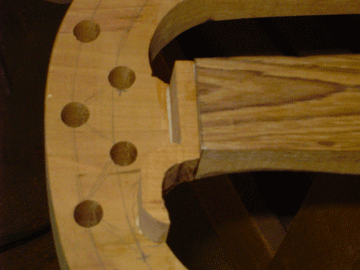
Here are the layout lines for the neck. because there is no need to taper the strings toward the back of the instrument, the fingerboard will be straight and flat. I drew both a tapered neck and a straight neck to see which would be more exthetically pleasing, but in the end, having hand room at the soundboard end of the neck won out. The neck is modeled after the string spacing of my rebec, with one extra string (4 strings on the fingerboard, 2 suspended over the cutouts - these are either plucked or bowed as drones.
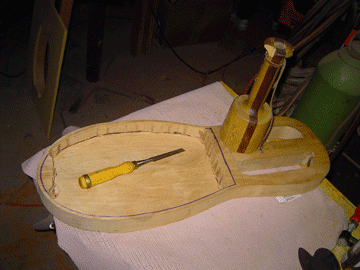
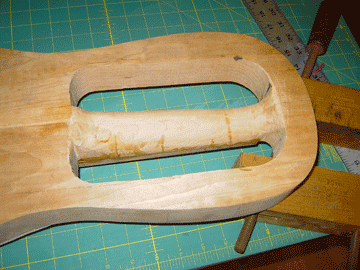
The neck has been cut out, the sides of the instrument have been sanded and the final shape determined, and the soundbox outline is drawn ready for me to hollow out the box. This instrument has a large soundbox, it should have a very rich tone. Unlike the other instruments of the early period, this instrument actually has the soundbox back coupled to the strings (similar to the way a soundpost couples the soundboard and back of a violin. The Bridge has feet that are unequal in length - one foot (the bass foot) goes through one of the soundholes and rests on the back, the other rests on the soundboard like a normal bridge. This makes the thickness of the back of this instrument more important than on the other instruments I have built.
 Working
on hollowing the soundbox. My standard forstner bit (for gross
stock removal) / sandpaaper and thumb plane (for smoothing) / chisel
(for cleaning up the sides) method works best on flat-backed
instruments like this. One day maybe I'll get a pattern router
and this job will become much easier, but for now I kinda enjoy the
handwork (but I wouldn't want to hollow out the whole thing with a
gouge and sash chisel - I like starting with an 80% hollowed board like
I get with the forstner bit - with limited free time I have to make a
few concessions). The soundboard will sit on top of the sides on
this instrument, not relieved into them like the rote. One reason
is to elevate the strings higher above the peghead area - I will also
have to lower the peghead so that I can get the needed down tension on
the strings behind the nut to keep the strings in their slots in the
nut.
Working
on hollowing the soundbox. My standard forstner bit (for gross
stock removal) / sandpaaper and thumb plane (for smoothing) / chisel
(for cleaning up the sides) method works best on flat-backed
instruments like this. One day maybe I'll get a pattern router
and this job will become much easier, but for now I kinda enjoy the
handwork (but I wouldn't want to hollow out the whole thing with a
gouge and sash chisel - I like starting with an 80% hollowed board like
I get with the forstner bit - with limited free time I have to make a
few concessions). The soundboard will sit on top of the sides on
this instrument, not relieved into them like the rote. One reason
is to elevate the strings higher above the peghead area - I will also
have to lower the peghead so that I can get the needed down tension on
the strings behind the nut to keep the strings in their slots in the
nut.
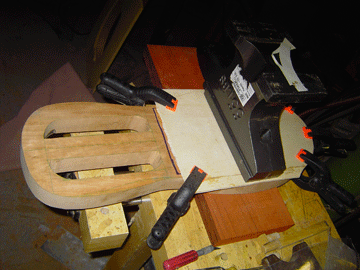
Gluing the soundboard on. The soundholes have already been cut into the soundboard and the soundbox is finished out. Again, the soundboard is mounted on top of the sides, to help rais the string height without having to build a higher bridge.
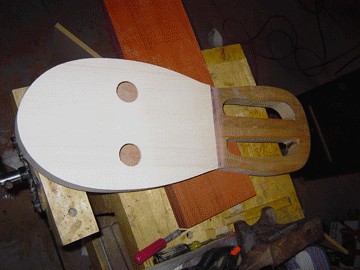
The soundboard flush trimmed and sanded to shape. The soundholes are large, and spaced far apart, for a reason. As I mentioned earlier, the bridge has uneven feet - the bass foot goes through one of the soundholes and sits on teh back of the instrument, the other foot sits on the soundboard. The bass side of the instrument is the top side in this picture, it is the side that has the 2 free drones as well.
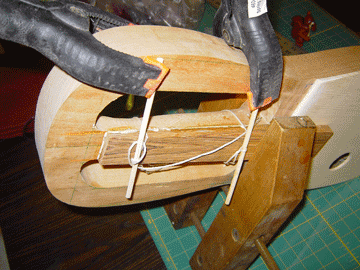
Now to add the fingerboard. This is a fretless instrument, and because the bridge is flat, so is the fingerboard. Because of the really strange space limitations, I decided to use a twisted cord clamp system (a loop of cord tied around the neck and the fingerboard, with a dowell inserted and twisted round until the desired tension is reached. The Jorgensen clamp is a perfect clamp for the front of the fingerboard.
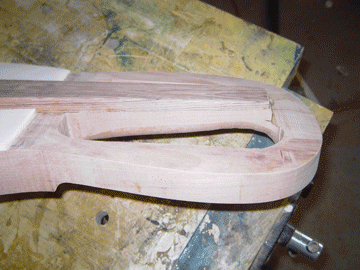
The neck of the Crwth has been rough shaped, the fingerboard is glued in place, and now it is time for a littel clean-up before moving to shaping the arms and the rest of the peg area.
The top of the arms have been tapered from the table of the Crwth down 1/2 inch. to meet the peghead area of the instrument. This will provide almost 1 inch clear below the notches in the nut, enough tension to hold the strings securely. At this point I still haven't decided if I want the pegs on the top or the bottom of the instrument, both were common practice and both have their pros and cons.

The underside of the Crwth arms and neck - I don't know why I decided to take down the underside of the arms - is really wasn't necessary or functional, I just liked the way it looks better. This is a strange instrument anyway, it should look like it from any angle.
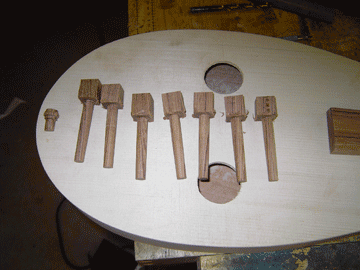
Again with the mandatory shot of the roughed-in tuning pegs and the tail pin. This has to be the part of instrument building I like the least - one day I am going to sit down and just make a box of pins to last a couple of dozen instruments, then I won't have to do this every time I want to build something. Not that it is hard, it is just boring after the first 50 or so...
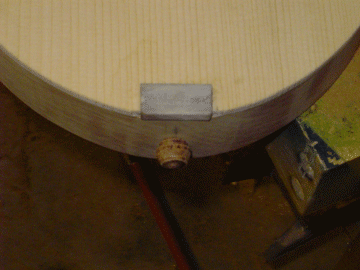
The tail pin installed on the nose of the Crwth. I have also added an antler saddle to keep the tailgut from damaging the softwood soundboard. I am waiting to finish the instrument until I have strung it and given it a while to work in - since neither I nor, as far as I know, anyone else, has any real knowledge of the early round crwth, I am not eager to put a final finish on it until I know I won't have to tear some or all of it apart to make changes.
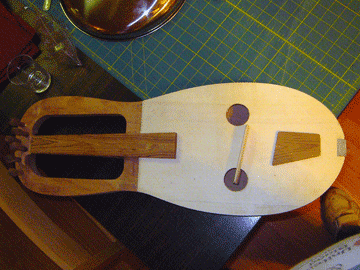
Here is the other really unusual part of this instrument - the base to the parted nut. 4 of the strings run across the fingerboard, 2 are off to the bass side of the instrument over the cutout. Thus you need a nut for the fretted strings and a separate nut for the drones - but they have to be on the same level so that you can bow all 6 strings at once. So I created a wooden base for the bridges, with the grain running vertically for strength. I will put bone or antler nuts on this base, either 2 separate nuts, or one that mimics the sicle shape of the base. The hole for the 6th peg is just off the bottom of this picture.
The pins are finished, the bridge is made, the tailpiece is shaped but not drilled yet (trying to decide if I want to install fine tuners or not). The nuts are still not installed, but that is the last thing that I will need before I can string the thing and try it out. I am starting to get excited about this - the Crwth is the goal for all the learning I have done on the rebecs and the lyre, and I am more than a little nervous about this being a really spectacular failure. Maybe I should have waited until I was finished to document the instrument, but hey, if you can't follow along real-time, it's somehow not as cool, right?

This is the first of the Crwth projects. It is being designed based on the modern folk Crwth of Wales, since that is the earliest extant instrument we have available, and it can be tuned and played according to manuscript instructions from the 1100s.
I am basing the shape of the instrument on the picture of King David with his Crwth, though I am building this as a 6 string variant that is the 'traditional' Crwth, similar to the 6 string lyres of the period.
Note that if I were to build this as a 3 string instrument, it would have a similar, but not nearly as rich harmonically, tone, as the 6 string crwth is tuned in 3 octave pairs, and the 3 string would be tuned in 3 singles with the same intervals.
This is a bowed lyre, but the bass pair of strings can also be plucked with the thumb as a drone.
Click here for a sound clip (until the instrument is finished, I have
borrowed a small snippet ot sound from the educational page that
actually got me started ion this adventure with the Crwth. Once
this instrument is finished, this clip will be replaced with one of my
own)(Note. I haven't mentioned this in any of the previous instrument documents, but my method of documenting is to take pictures of each step 'in the rough' as it were, then to take finished pictures of the instrument. I believe that seeing something with some of the toolmarks still in it, layout lines still on the surface, not smoothed and painted and oiled, shows you far more than a 'finished' photo of each step. So you can see what I am doing, not just read the words and imagine. I think it works better that way. And you still get to see pictures of the pretty when it is complete)
This is the artwork I am basing this Crwth on. It is from one of the 11th century manuscripts from Limoges in Brittany. I am using the general shape and size from the illustration, and working with what I have learned from Lyre and Rebec building to fill in the rest
Comparative measurements on me while sitting give me a 25 inch crwth, 7 inches at the swelling at the peg end, and 9 inches at the swelling at the soundbox.
The Crwth body will be built in the same way as the rebec and the lyre - hollowed from a block and not built up. The soundboard will be spruce, the
Here is the body being glued up. This instrument would have been hollowed out of 1 single piece, but the cherry I had was just crying to be made into an instrument, so I joined 2 pieces to give me the width I need for the instrument. The joint will be visible only on the back side - the fingerboard and peg reinforcements will cover it on the front.
The cherry joined and planed - almost 10 inches wide, 26 inches long in this picture. This is a beautiful piece of wood, with no stress checks or fractures anywhere along the length.
The instrument's basic shape - a little stockier than the illustration, but I want to use a traditional 6 string setup instead of a 3 string as shown in the David illustration - it provides a much different, and IMHO cooler, sound. So it is about 1 inch wider in the neck area and peghead than it would be if I were actually following the illustration, and to balance it I made the soundbox 1/2 inch wider.
Here are the layout lines for the neck. because there is no need to taper the strings toward the back of the instrument, the fingerboard will be straight and flat. I drew both a tapered neck and a straight neck to see which would be more exthetically pleasing, but in the end, having hand room at the soundboard end of the neck won out. The neck is modeled after the string spacing of my rebec, with one extra string (4 strings on the fingerboard, 2 suspended over the cutouts - these are either plucked or bowed as drones.
The neck has been cut out, the sides of the instrument have been sanded and the final shape determined, and the soundbox outline is drawn ready for me to hollow out the box. This instrument has a large soundbox, it should have a very rich tone. Unlike the other instruments of the early period, this instrument actually has the soundbox back coupled to the strings (similar to the way a soundpost couples the soundboard and back of a violin. The Bridge has feet that are unequal in length - one foot (the bass foot) goes through one of the soundholes and rests on the back, the other rests on the soundboard like a normal bridge. This makes the thickness of the back of this instrument more important than on the other instruments I have built.
Working
on hollowing the soundbox. My standard forstner bit (for gross
stock removal) / sandpaaper and thumb plane (for smoothing) / chisel
(for cleaning up the sides) method works best on flat-backed
instruments like this. One day maybe I'll get a pattern router
and this job will become much easier, but for now I kinda enjoy the
handwork (but I wouldn't want to hollow out the whole thing with a
gouge and sash chisel - I like starting with an 80% hollowed board like
I get with the forstner bit - with limited free time I have to make a
few concessions). The soundboard will sit on top of the sides on
this instrument, not relieved into them like the rote. One reason
is to elevate the strings higher above the peghead area - I will also
have to lower the peghead so that I can get the needed down tension on
the strings behind the nut to keep the strings in their slots in the
nut.Gluing the soundboard on. The soundholes have already been cut into the soundboard and the soundbox is finished out. Again, the soundboard is mounted on top of the sides, to help rais the string height without having to build a higher bridge.
The soundboard flush trimmed and sanded to shape. The soundholes are large, and spaced far apart, for a reason. As I mentioned earlier, the bridge has uneven feet - the bass foot goes through one of the soundholes and sits on teh back of the instrument, the other foot sits on the soundboard. The bass side of the instrument is the top side in this picture, it is the side that has the 2 free drones as well.
Now to add the fingerboard. This is a fretless instrument, and because the bridge is flat, so is the fingerboard. Because of the really strange space limitations, I decided to use a twisted cord clamp system (a loop of cord tied around the neck and the fingerboard, with a dowell inserted and twisted round until the desired tension is reached. The Jorgensen clamp is a perfect clamp for the front of the fingerboard.
The neck of the Crwth has been rough shaped, the fingerboard is glued in place, and now it is time for a littel clean-up before moving to shaping the arms and the rest of the peg area.
The top of the arms have been tapered from the table of the Crwth down 1/2 inch. to meet the peghead area of the instrument. This will provide almost 1 inch clear below the notches in the nut, enough tension to hold the strings securely. At this point I still haven't decided if I want the pegs on the top or the bottom of the instrument, both were common practice and both have their pros and cons.
The underside of the Crwth arms and neck - I don't know why I decided to take down the underside of the arms - is really wasn't necessary or functional, I just liked the way it looks better. This is a strange instrument anyway, it should look like it from any angle.
Again with the mandatory shot of the roughed-in tuning pegs and the tail pin. This has to be the part of instrument building I like the least - one day I am going to sit down and just make a box of pins to last a couple of dozen instruments, then I won't have to do this every time I want to build something. Not that it is hard, it is just boring after the first 50 or so...
The tail pin installed on the nose of the Crwth. I have also added an antler saddle to keep the tailgut from damaging the softwood soundboard. I am waiting to finish the instrument until I have strung it and given it a while to work in - since neither I nor, as far as I know, anyone else, has any real knowledge of the early round crwth, I am not eager to put a final finish on it until I know I won't have to tear some or all of it apart to make changes.
Here is the other really unusual part of this instrument - the base to the parted nut. 4 of the strings run across the fingerboard, 2 are off to the bass side of the instrument over the cutout. Thus you need a nut for the fretted strings and a separate nut for the drones - but they have to be on the same level so that you can bow all 6 strings at once. So I created a wooden base for the bridges, with the grain running vertically for strength. I will put bone or antler nuts on this base, either 2 separate nuts, or one that mimics the sicle shape of the base. The hole for the 6th peg is just off the bottom of this picture.
The pins are finished, the bridge is made, the tailpiece is shaped but not drilled yet (trying to decide if I want to install fine tuners or not). The nuts are still not installed, but that is the last thing that I will need before I can string the thing and try it out. I am starting to get excited about this - the Crwth is the goal for all the learning I have done on the rebecs and the lyre, and I am more than a little nervous about this being a really spectacular failure. Maybe I should have waited until I was finished to document the instrument, but hey, if you can't follow along real-time, it's somehow not as cool, right?