Trossingen Lyre #2 (Fionn's was
first) - the Electrossingen
This is the second Trossingen style lyre to come out of the shop. It is sort of a parody, the middle step between the actual reproduction that Fionn built and the way-out full electric Fender-style solid body that is the next project. But just because it is silly, doesn't mean it has to be built badly. I followed closely the work that Fionn did on hers, and with a few modifications necessary to hide the electronics, built mine from what she learned on her project. The parts are all made out of the correct materials, the soundboard is properly shaped, it is pretty much a good replica except that I increased it's overall thickness by about 3/16 inch to accommodate the volume and tone potentiometers. It is as accurate as I can make it, but still not so well done as Fionn's
I will not go into the basic construction part again - once Fionn puts her page up, you will see everything that has to be done to get to where these pictures start. So from the top (of the important, different part), here goes.
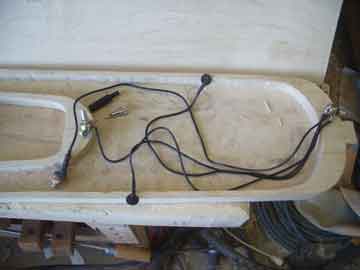
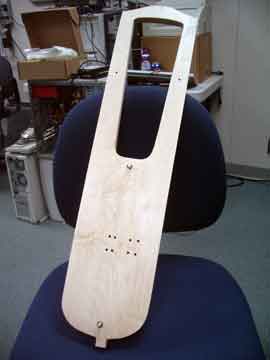
Here is the basic hollowed corpus with the pickup set laid out for sizing. I had it made a bit big, but you can specify how you would like it wired. The guys at JJB Electronics (https://www.jjb-electronics.com/VTP-200.html is the link to the product I am using) are very helpful. These are very responsive and sensitive pickups - before deciding how to do the installation on this lyre I attached these pickups to the soundboards of several of my other finished lyres, and the sound is terrific from them.
With the recesses made to hide the volume and tone post in the proper location, and the cable jack set into the tailpin, and the phenolic mounting plates made for the pots, here is what it looks like.
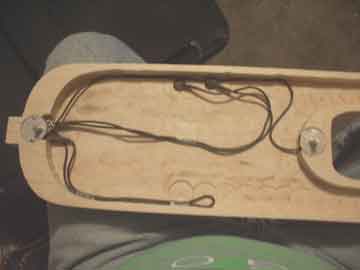
The soundboard is cut and profiled, waiting to be glued on. Neat thing about hide glue, if I need to fix something later, I can remove the soundboard without damage. That's cool. Not the holes where the original beechwood pegs went through the soundboard of the lyre - this is how I am hiding the tone and volume knobs - they will be these dowels. A small dot of 5 minute epoxy on the button pickups (just a tiny bit - it will hold) under the soundboard at the feet of the bridge and it's ready to be joined
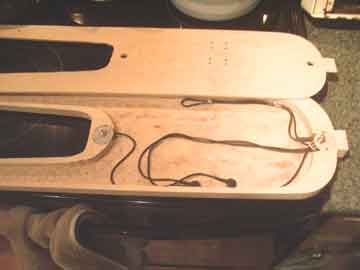
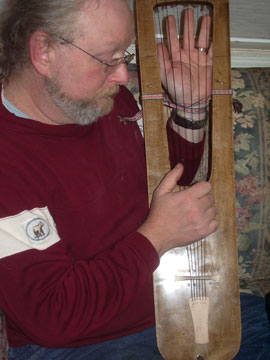
The soundboard laid into place. This is the way the instrument will be set up. I have exchanged the 1/4 inch cable jack for a 1/8 inch inline jack to better fit in the tailpin. The soundboard is not glued up at this time - I need the extra set of hands available later today to help with the hide gluing.
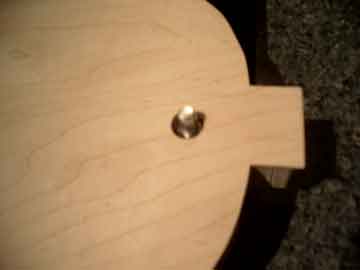
My camera doesn't want to take this picture, perhaps when the lighting is different. This is the volume pot shaft sticking out of the soundboard. The tone control looks the same, except on the upper end of the soundbox. Need to do the final shaping and profiling of the instrument, and then add the knobs. I set the volume at the bottom where it would be easier to reach, and the tone up under the strings at the top side. 1 more good evening, and I will have some sound clips of the instrument.
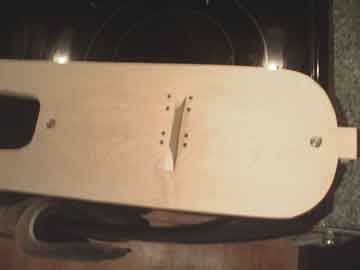
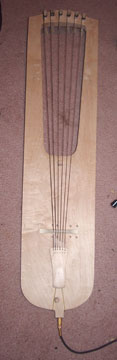
The instrument with the soundboard glued into place and smoothed up. I chose hide glue for this part not only because it is what was used on the original, but also due to the lack of a soundhole in this lyre. Since I have no way to get into the instrument for repairs except to remove the soundboard, I used a glue that would allow me to do so without major difficulty, but would be strong and secure at the same time. At this point I still have to drill for the tuning pins, finish smoothing and preparing the tailpin, make the dowel knobs for the pots, and then I can string it to see what it sounds like.
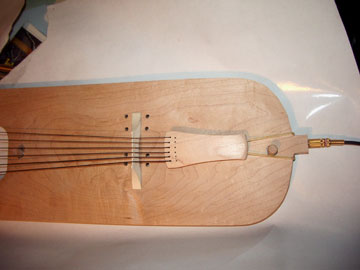
The business end of the lyre. Maple tailpiece, willow bridge, the cheapest black nylon Ernie Ball ball end guitar treble sets I could buy. The soundboard 'dowels' (actually the volume and tone controls) are made of beechwood. The tailpiece has been drilled for ball end or tie-in strings. The tailgut puts just a bit of pressure on the volume knob - keeps it in place.
The instrument completely playable, jacked into an amp. It has a pretty cool sound, and with the cable comes a variety of optional effects boxes. I have already played it through my sound board in my computer, through my old Fender TKO 80 bass amp, and through my little smokey Supro pocket amp - it is cool through all 3. I will put some sound clips up as soon as the strings stretch and hold tune well enough for me to play something reasonable. This was definitely a really cool project, and very worthwhile.
I will be unstringing it soon, to apply the finish of dark brown Briwax to the body. As I am not interested as much in this being a perfect copy of the original, and I like dark finishes on pretty wood, this is going to be nice. I am going to flame the ash pegs, and wax the tailpiece with the same briwax. I will probably darken the bridge a bit with some tung oil, just to keep it from being so blinding white on the darker finish.
OK, the final product. Hand made tablet weave strap, the body stained with dark brown Briwax, the bridge and tailpiece left natural for contrast. Really an instrument I am proud of.
So far this has been a very neat escape - many of my more authenticity driven friends are dismayed, but most of the local music crowd is very enthusiastic about the pair of electric instruments I am building. I am even getting discounts from a few of the local music stores, with the promise of course that they get to play around with the instruments. Perhaps this will open up a little bit of a new performance venue - there are many little battery operated belt amps (I use a Supro - a bit overdriven and distorted, granted, but fun until I find one of the little pocket marshal stacks for cheap) and with hidden cable (I am covering mine in a lucet woven silk cord 'sleeve' and hiding my amp in a custom leather belt pouch) there are some venues that were previously impractical for an instrument like this - such as outdoor SCA events and actually playing with other instruments - not a period thing to do, but fun with the right folks.

This is the second Trossingen style lyre to come out of the shop. It is sort of a parody, the middle step between the actual reproduction that Fionn built and the way-out full electric Fender-style solid body that is the next project. But just because it is silly, doesn't mean it has to be built badly. I followed closely the work that Fionn did on hers, and with a few modifications necessary to hide the electronics, built mine from what she learned on her project. The parts are all made out of the correct materials, the soundboard is properly shaped, it is pretty much a good replica except that I increased it's overall thickness by about 3/16 inch to accommodate the volume and tone potentiometers. It is as accurate as I can make it, but still not so well done as Fionn's
I will not go into the basic construction part again - once Fionn puts her page up, you will see everything that has to be done to get to where these pictures start. So from the top (of the important, different part), here goes.
Here is the basic hollowed corpus with the pickup set laid out for sizing. I had it made a bit big, but you can specify how you would like it wired. The guys at JJB Electronics (https://www.jjb-electronics.com/VTP-200.html is the link to the product I am using) are very helpful. These are very responsive and sensitive pickups - before deciding how to do the installation on this lyre I attached these pickups to the soundboards of several of my other finished lyres, and the sound is terrific from them.
With the recesses made to hide the volume and tone post in the proper location, and the cable jack set into the tailpin, and the phenolic mounting plates made for the pots, here is what it looks like.
The soundboard is cut and profiled, waiting to be glued on. Neat thing about hide glue, if I need to fix something later, I can remove the soundboard without damage. That's cool. Not the holes where the original beechwood pegs went through the soundboard of the lyre - this is how I am hiding the tone and volume knobs - they will be these dowels. A small dot of 5 minute epoxy on the button pickups (just a tiny bit - it will hold) under the soundboard at the feet of the bridge and it's ready to be joined
The soundboard laid into place. This is the way the instrument will be set up. I have exchanged the 1/4 inch cable jack for a 1/8 inch inline jack to better fit in the tailpin. The soundboard is not glued up at this time - I need the extra set of hands available later today to help with the hide gluing.
My camera doesn't want to take this picture, perhaps when the lighting is different. This is the volume pot shaft sticking out of the soundboard. The tone control looks the same, except on the upper end of the soundbox. Need to do the final shaping and profiling of the instrument, and then add the knobs. I set the volume at the bottom where it would be easier to reach, and the tone up under the strings at the top side. 1 more good evening, and I will have some sound clips of the instrument.
The instrument with the soundboard glued into place and smoothed up. I chose hide glue for this part not only because it is what was used on the original, but also due to the lack of a soundhole in this lyre. Since I have no way to get into the instrument for repairs except to remove the soundboard, I used a glue that would allow me to do so without major difficulty, but would be strong and secure at the same time. At this point I still have to drill for the tuning pins, finish smoothing and preparing the tailpin, make the dowel knobs for the pots, and then I can string it to see what it sounds like.
The business end of the lyre. Maple tailpiece, willow bridge, the cheapest black nylon Ernie Ball ball end guitar treble sets I could buy. The soundboard 'dowels' (actually the volume and tone controls) are made of beechwood. The tailpiece has been drilled for ball end or tie-in strings. The tailgut puts just a bit of pressure on the volume knob - keeps it in place.
The instrument completely playable, jacked into an amp. It has a pretty cool sound, and with the cable comes a variety of optional effects boxes. I have already played it through my sound board in my computer, through my old Fender TKO 80 bass amp, and through my little smokey Supro pocket amp - it is cool through all 3. I will put some sound clips up as soon as the strings stretch and hold tune well enough for me to play something reasonable. This was definitely a really cool project, and very worthwhile.
I will be unstringing it soon, to apply the finish of dark brown Briwax to the body. As I am not interested as much in this being a perfect copy of the original, and I like dark finishes on pretty wood, this is going to be nice. I am going to flame the ash pegs, and wax the tailpiece with the same briwax. I will probably darken the bridge a bit with some tung oil, just to keep it from being so blinding white on the darker finish.
OK, the final product. Hand made tablet weave strap, the body stained with dark brown Briwax, the bridge and tailpiece left natural for contrast. Really an instrument I am proud of.
So far this has been a very neat escape - many of my more authenticity driven friends are dismayed, but most of the local music crowd is very enthusiastic about the pair of electric instruments I am building. I am even getting discounts from a few of the local music stores, with the promise of course that they get to play around with the instruments. Perhaps this will open up a little bit of a new performance venue - there are many little battery operated belt amps (I use a Supro - a bit overdriven and distorted, granted, but fun until I find one of the little pocket marshal stacks for cheap) and with hidden cable (I am covering mine in a lucet woven silk cord 'sleeve' and hiding my amp in a custom leather belt pouch) there are some venues that were previously impractical for an instrument like this - such as outdoor SCA events and actually playing with other instruments - not a period thing to do, but fun with the right folks.