Here's Anglo-Saxon Lyre Mark 2
(Rhiannon's)
This is the second Lyre - lots of changes based on the prototype.
First, switched to maple for the body, and added 1/8 inch to the thickness. The Sutton Hoo Lyre seems to be one of the largest of the simple lyres, and it is the one I am taking my dimensions from. It is nearly 30 inches long and 8 1/4 inch wide, and the original was measured at about 1 inch thick with very near 20 inches from the pegs to the bridge (as far as the 'experts' can ascertain).
The prototype Lyre had the headpiece mortised into the arms like the original Sutton Hoo, I have decided to change this on this second Lyre. See the construction details to determine what I did and for what reason.
This Lyre will become the property of Rhiannon, a talented musician from Ansteorra. It is being built in order for her to perform at Gulf Wars.
 Click here for a sound clip (instrument only)
Click
here for another sound clip (a few seconds of singing accompanied by
the instrument) )
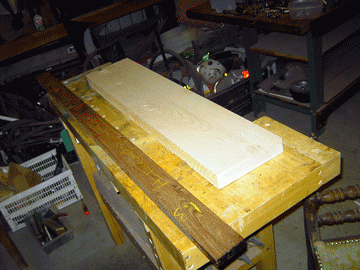
The start of the Lyre - Hard Maple for the body and rosewood for the tailpiece and the pegs and the tailpin. This starts out as a 6/4 piece of maple, so that I can get 1 1/8 inch for the body. Being a bowmaker, I know one thing about controlling the amount of flex or bow in a piece of wood - if you want to double the amount of force it takes to bend a stick, either make it twice as wide or 1/8 thicker. I chose to go with thicker, to try to avoid the problems the previous Lyre had with warping. This piece will be trimmed to 29 3/4 x 8 1/2 x 1 3/16.
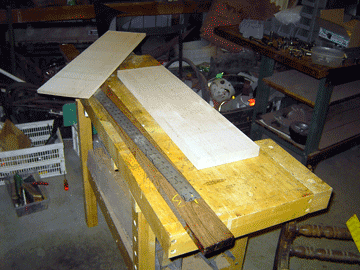
Here is the piece cut to dimension and resawn to 1 3/16. I am going to add the reinforcements to the headpiece area and then take the whole thing to dimension before I mount the soundboard.

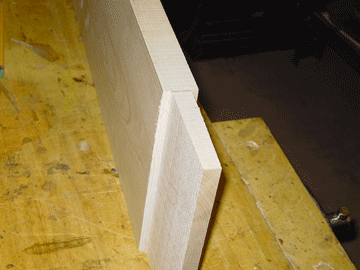
I have relieved the top of the instrument for the soundboard and the headpiece reinforcements. The reason that the headpiece was mortised into the big Lyres in period was that the grain direction had to run across the instrument at the tuning pins. If it ran the same direction as the pins, the tension on the pins would simply break the wood.
My solution was to add pieces to the top and bottom of the headpiece with the grain running perpendicular to the length of the instrument. This would provide the reinforcement needed to keep the pins from pulling through, and still retain the strength of a non-jointed piece of wood at the transition, as the center of the reinforced area will be the body itself.
Here is the headpiece detail - both sides relieved to have maple reinforcements glued on with the grain running perpendicular. The reliefs are nearly 4 inches. This end of the body will be glued and the whole body taken to finish thickness. Then the body will be hollowed out in the soundboard area.
The soundboard will then be mounted, and the outline and handhole will be cut and finished.
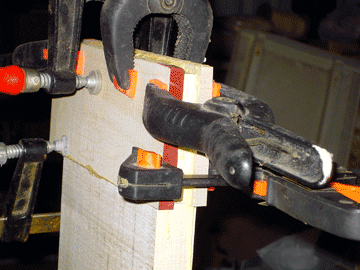
Here the reinforcements are glued onto the teadpiece tenon. Lots of glue, lots of clamps, lots of squeexe-out, but that will all come off when the final shape is cut.
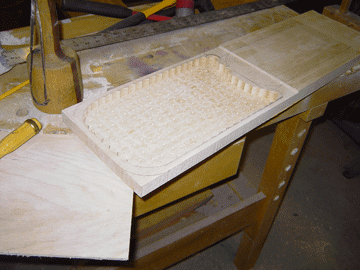
The Lyre is drawn on the wood, and the body is hollowed out. Because this is a completely flat-bottomed soundbox, I used a forstner bit to do most of the stock removal.

With the drill press set to highest speed, I used a turn-loc sanding disk (the type used by automotive body repairmen) set to a little more than 1/8 inch off the table of the drill press, then smoothed and finished the bottom of the soundbox hollow. I then used a simple sash chisel to remove the points from the perimeter of the box. (And you thought that musical instrument making was a neat and clean activity, didn't ya?)
Then I simply glued an oversized piece of the soundboard plywood to the body, weighted it down with a few anvils, and let it dry.
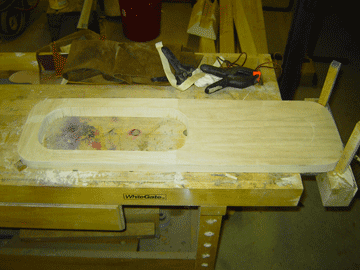
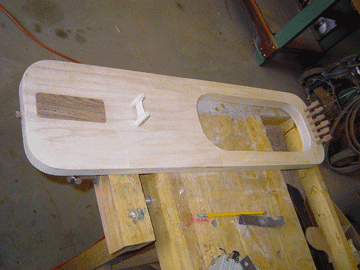
After the soundboard glue dries, I just cut to the outline already drawn on the lyre. some work with a long sanding block (again, the type used in auto-body work) to get everything levelled, and it is time to start making the fittings for the lyre.
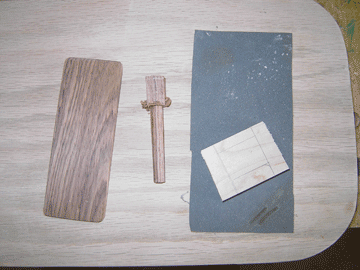
Here is the rough tailpiece, a rough tuning peg, and the rough bridge. The pegs and tailpiece are rosewood, the bridge is the same maple the body is made of, with the grain oriented properly.
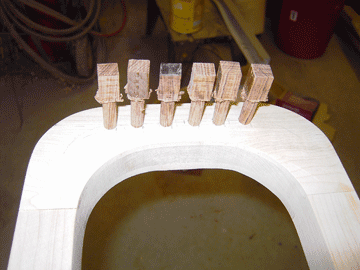
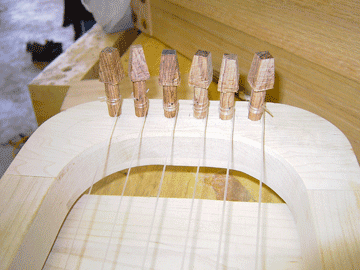
Here is the headpiece detail with the rough pegs fit into their tapered holes. I use a 5 degree taper standard for tapered machinists reamers. The strings will be 3/4 inch apart on the finished instrument at the headpiece, which gives a usable variation in string spacing all along the handhole for people with various sized fingers and hands.
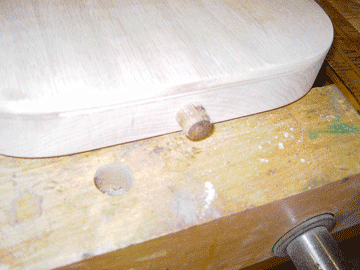
Here is the tail peg, mounted in the body. It is not tapered, just a cylinder fit into a properly sized hole, with a turned button on the end to hold the tailgut.
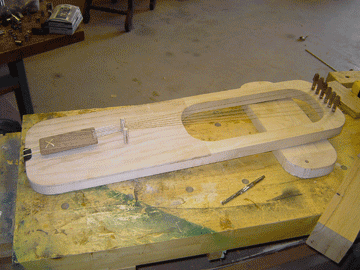
No strings, just everything layed out where is should go. Now to string it and make some sound.
The headpiece when strung - it is odd to try to get every string to be close to level with it's neighbors without a nut - but it really isn't that critical to the playing of the instrument. This one is strung with nylon, it just (to my ears) sounds better, and it is a LOT easier on the instrument
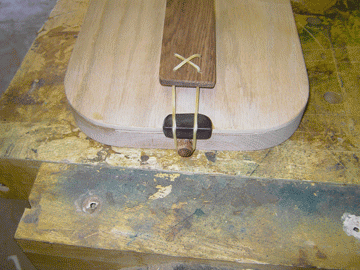
The tailpiece detail, showing the horn saddle and the tailgut attachment. The saddle just keeps the tailgut from gutting into the body.
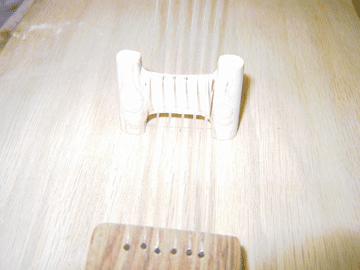
The bridge. The castle-shaped bridge is typical of the archeological finds - this is a fairly large bridge, but since the Sutton Hoo Lyre is the second largest lyre we have evidence of from this period, it made sense to use the dimensions of one of the largest bridges we have found. In reality this bridge would have been made of amber or bone, but this one works pretty well.
The finished and strung Lyre - it sounds really neat. And in the current tuning of b-flat, c, d, e-flat, f, g, you can easily play the theme to Gilligan's Island on it (in other words, it is perfectly suited to proper ballad form).
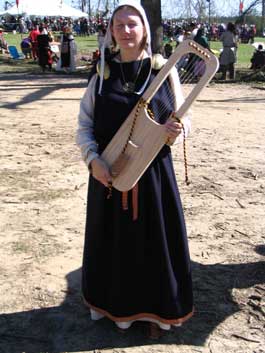
And the owner of the Lyre, Rhiannon. This photo was taken of her at Gulf Wars. The instrument in appearance is very dramatic - the woodgrain and tones, and the lack of strangely colored exotic woods, makes this a very 'believable' period instrument in appearance. I am very pleased with the outcome of this project, and am looking forward to using some of what I learned doing it to build my next Rote.
This has been quite the fun project - and this Lyre is so much nicer than the previous one - so many lessons learned about construction. It sounds cool, it looks nice, and it is easy to play. My fears of it's durability seem unfounded - the instrument survived Gulf Wars just fine, with many compliments on how well it sounded in what would have been a very typical period environment. Rhiannon is able to bring out the best in this instrument, some folks even thought her playing was acutally a professional CD recording - and while this is not in small bit the result of my work, it still makes a builder feel good.

This is the second Lyre - lots of changes based on the prototype.
First, switched to maple for the body, and added 1/8 inch to the thickness. The Sutton Hoo Lyre seems to be one of the largest of the simple lyres, and it is the one I am taking my dimensions from. It is nearly 30 inches long and 8 1/4 inch wide, and the original was measured at about 1 inch thick with very near 20 inches from the pegs to the bridge (as far as the 'experts' can ascertain).
The prototype Lyre had the headpiece mortised into the arms like the original Sutton Hoo, I have decided to change this on this second Lyre. See the construction details to determine what I did and for what reason.
This Lyre will become the property of Rhiannon, a talented musician from Ansteorra. It is being built in order for her to perform at Gulf Wars.
Click here for a sound clip (instrument only)Click
here for another sound clip (a few seconds of singing accompanied by
the instrument) )The start of the Lyre - Hard Maple for the body and rosewood for the tailpiece and the pegs and the tailpin. This starts out as a 6/4 piece of maple, so that I can get 1 1/8 inch for the body. Being a bowmaker, I know one thing about controlling the amount of flex or bow in a piece of wood - if you want to double the amount of force it takes to bend a stick, either make it twice as wide or 1/8 thicker. I chose to go with thicker, to try to avoid the problems the previous Lyre had with warping. This piece will be trimmed to 29 3/4 x 8 1/2 x 1 3/16.
Here is the piece cut to dimension and resawn to 1 3/16. I am going to add the reinforcements to the headpiece area and then take the whole thing to dimension before I mount the soundboard.
I have relieved the top of the instrument for the soundboard and the headpiece reinforcements. The reason that the headpiece was mortised into the big Lyres in period was that the grain direction had to run across the instrument at the tuning pins. If it ran the same direction as the pins, the tension on the pins would simply break the wood.
My solution was to add pieces to the top and bottom of the headpiece with the grain running perpendicular to the length of the instrument. This would provide the reinforcement needed to keep the pins from pulling through, and still retain the strength of a non-jointed piece of wood at the transition, as the center of the reinforced area will be the body itself.
Here is the headpiece detail - both sides relieved to have maple reinforcements glued on with the grain running perpendicular. The reliefs are nearly 4 inches. This end of the body will be glued and the whole body taken to finish thickness. Then the body will be hollowed out in the soundboard area.
The soundboard will then be mounted, and the outline and handhole will be cut and finished.
Here the reinforcements are glued onto the teadpiece tenon. Lots of glue, lots of clamps, lots of squeexe-out, but that will all come off when the final shape is cut.
The Lyre is drawn on the wood, and the body is hollowed out. Because this is a completely flat-bottomed soundbox, I used a forstner bit to do most of the stock removal.
With the drill press set to highest speed, I used a turn-loc sanding disk (the type used by automotive body repairmen) set to a little more than 1/8 inch off the table of the drill press, then smoothed and finished the bottom of the soundbox hollow. I then used a simple sash chisel to remove the points from the perimeter of the box. (And you thought that musical instrument making was a neat and clean activity, didn't ya?)
Then I simply glued an oversized piece of the soundboard plywood to the body, weighted it down with a few anvils, and let it dry.
After the soundboard glue dries, I just cut to the outline already drawn on the lyre. some work with a long sanding block (again, the type used in auto-body work) to get everything levelled, and it is time to start making the fittings for the lyre.
Here is the rough tailpiece, a rough tuning peg, and the rough bridge. The pegs and tailpiece are rosewood, the bridge is the same maple the body is made of, with the grain oriented properly.
Here is the headpiece detail with the rough pegs fit into their tapered holes. I use a 5 degree taper standard for tapered machinists reamers. The strings will be 3/4 inch apart on the finished instrument at the headpiece, which gives a usable variation in string spacing all along the handhole for people with various sized fingers and hands.
Here is the tail peg, mounted in the body. It is not tapered, just a cylinder fit into a properly sized hole, with a turned button on the end to hold the tailgut.
No strings, just everything layed out where is should go. Now to string it and make some sound.
The headpiece when strung - it is odd to try to get every string to be close to level with it's neighbors without a nut - but it really isn't that critical to the playing of the instrument. This one is strung with nylon, it just (to my ears) sounds better, and it is a LOT easier on the instrument
The tailpiece detail, showing the horn saddle and the tailgut attachment. The saddle just keeps the tailgut from gutting into the body.
The bridge. The castle-shaped bridge is typical of the archeological finds - this is a fairly large bridge, but since the Sutton Hoo Lyre is the second largest lyre we have evidence of from this period, it made sense to use the dimensions of one of the largest bridges we have found. In reality this bridge would have been made of amber or bone, but this one works pretty well.
The finished and strung Lyre - it sounds really neat. And in the current tuning of b-flat, c, d, e-flat, f, g, you can easily play the theme to Gilligan's Island on it (in other words, it is perfectly suited to proper ballad form).
And the owner of the Lyre, Rhiannon. This photo was taken of her at Gulf Wars. The instrument in appearance is very dramatic - the woodgrain and tones, and the lack of strangely colored exotic woods, makes this a very 'believable' period instrument in appearance. I am very pleased with the outcome of this project, and am looking forward to using some of what I learned doing it to build my next Rote.
This has been quite the fun project - and this Lyre is so much nicer than the previous one - so many lessons learned about construction. It sounds cool, it looks nice, and it is easy to play. My fears of it's durability seem unfounded - the instrument survived Gulf Wars just fine, with many compliments on how well it sounded in what would have been a very typical period environment. Rhiannon is able to bring out the best in this instrument, some folks even thought her playing was acutally a professional CD recording - and while this is not in small bit the result of my work, it still makes a builder feel good.